Registering for OSG Connect
The major steps to getting started on OSG Connect are:
- Apply for an OSG Connect account
- Meet with an OSG Connect staff member for a short consultation and orientation.
- Join and set your default "project"
- Upload .ssh keys to the OSG Connect website
Each of these is detailed in the guide below.
Once you've gone through these steps, you should be able to login to the OSG Connect submit node.
Account Creation
Sign in to or Create an Account
Start by creating an OSG Connect account. Visit the OSG Connect web site, then click on the Sign Up button. You will need to agree to our Acceptable Use Policy in order to get to the main log in screen.
The main log in screen will prompt you to sign in via your primary institutional affiliation. Locate and select ‘Illinois Institute of Technology’ in the list.
After selecting IIT in the discovery service, you'll be taken to your IIT's local sign-in screen. Sign in using your campus credentials. When done, you'll return automatically to the OSG Connect portal and can carry on with signup.
After continuing, and allowing certain permissions in the next screen, you'll be asked to create a profile and save changes. If this works successfully, you should see that your membership to OSG is "pending" on the right hand side of the screen.
Orientation Meeting
Once you've applied to join OSG Connect as described above, an OSG Connect support team member will contact you to arrange an initial orientation meeting. This meeting generally takes about 20-30 minutes and is a chance to talk about your work, how it will fit on the OSG, and some practical next steps for getting started. Some of these next steps are also listed below.
Join a Project
As part of the sign up and meeting process, you'll be asked for information related to your research group so that you can be assigned to an accounting project. For more information about this process, see this guide: Start or Join a Project in OSG Connect
Generate and Add an SSH key
Once your account is created and you're approved, you can generate and upload an SSH key to the OSG Connect website; this key will be duplicated on the OSG Connect login node so that you're able to log in there and submit jobs.
To see how to generate and add an SSH key, please visit this page: Step by step instructions to generate and adding an SSH key
Generate SSH Keys and Activate Your OSG Login
Overview
OSG Connect requires SSH-key-based logins. You need to follow a two-step process to set up the SSH key to your account.
- Generate a SSH key pair.
- Add your public key to the submit host by uploading it to your OSG Connect user profile (via the OSG Connect website).
After completing the process, you can log in from a local computer (your laptop or desktop) to the OSG Connect login node assigned using either ssh or an ssh program like Putty -- see below for more details on logging in.
NOTE: Please do not edit the authorized keys file on the login node.
Step 1: Generate SSH Keys
If you already have an SSH keypair generated on the computer you will use to connect to OSG Connect, you can use that existing keypair. If you need to generate a new keypair and need help with that, please see the OSG Connect wiki for more detailed instructions:
portal.osg-htc.org/documentation
Alternatively, you can always contact RDC support at rdc-support@illinoistech.edu and we’d be more than happy to assist you.
Step 2: Add the Public SSH Key to Login Node
To add your public key to the OSG Connect log in node:
- Go to www.osgconnect.net and sign in with the institutional identity you used when requesting an OSG Connect account.
- Click "Profile" in the top right corner.
- Click the "Edit Profile" button located after the user information in the left hand box.
- Copy/paste the public key which is found in the .pub file into the "SSH Public Key" text box. The expected key is a single line, with three fields looking something like ssh-rsa ASSFFSAF... user@host. If you used the first set of key-generating instructions it is the content of ~/.ssh/id_rsa.pub and for the second (using PuTTYgen), it is the content from step 7 above.
- Click "Update Profile"
The key is now added to your profile in the OSG Connect website. This will automatically be added to the login nodes within a couple hours.
Logging In
After following the steps above to upload your key and it's been a few hours, you should be able to log in to OSG Connect.
Determine Which Login Node to Use
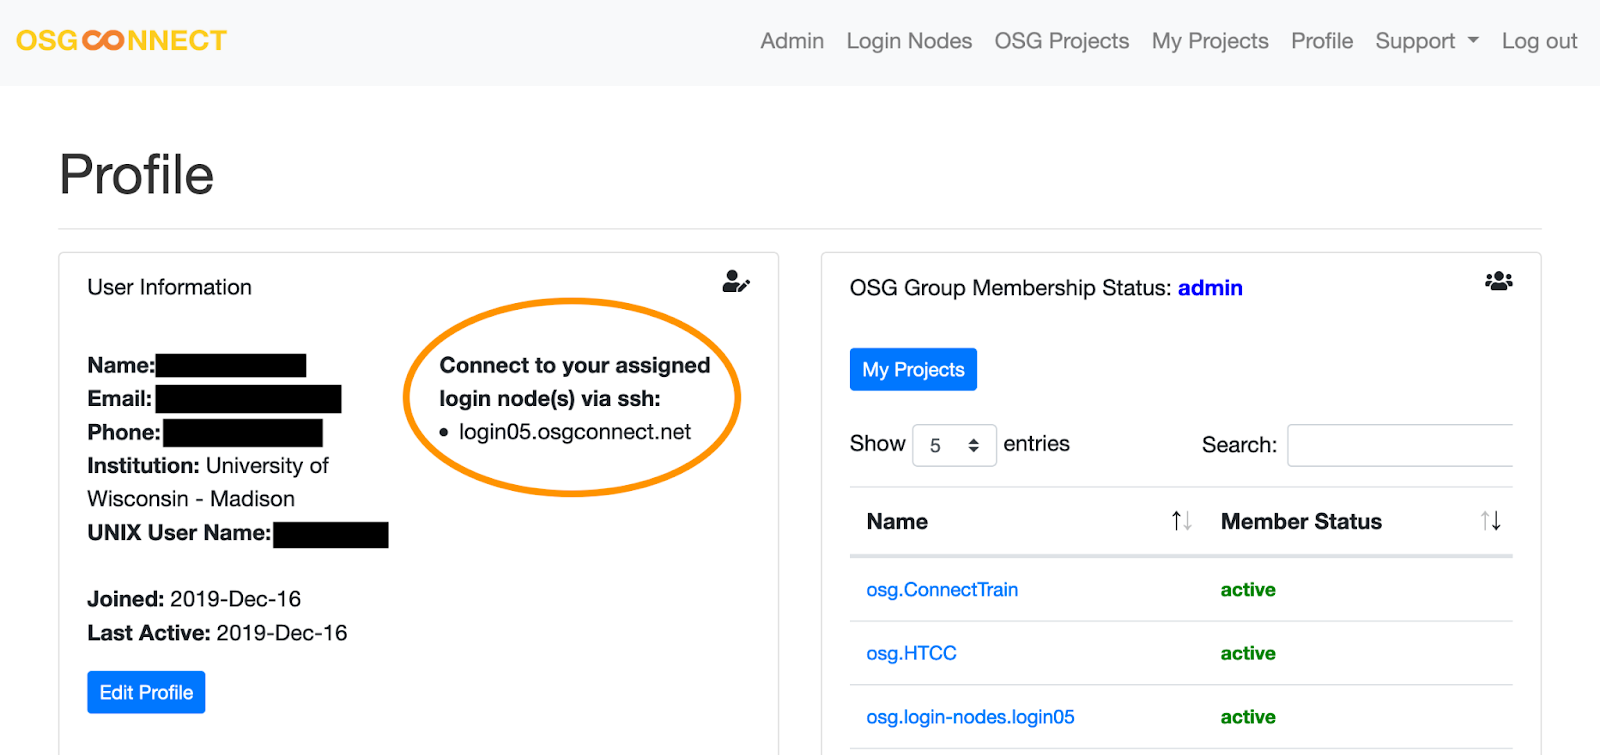
Before you can connect, you will need to know which login node your account is assigned to. You can find this information on your profile from the OSG Connect website.
- Go to www.osgconnect.net and sign in with your CILogin.
- Click "Profile" in the top right corner.
- The assigned login nodes are listed in the left side box. Make note of the address of your assigned login node as you will use this to connect to OSG Connect.
For Mac, Linux, or Newer Versions of Windows
Open a terminal and type in:
ssh <your_osg_connect_username>@<your_osg_login_node>
It will ask for the passphrase for your ssh key (if you set one) and then you should be logged in.
For Older Versions of Windows
On older versions of Windows, you can use the Putty program to log in.
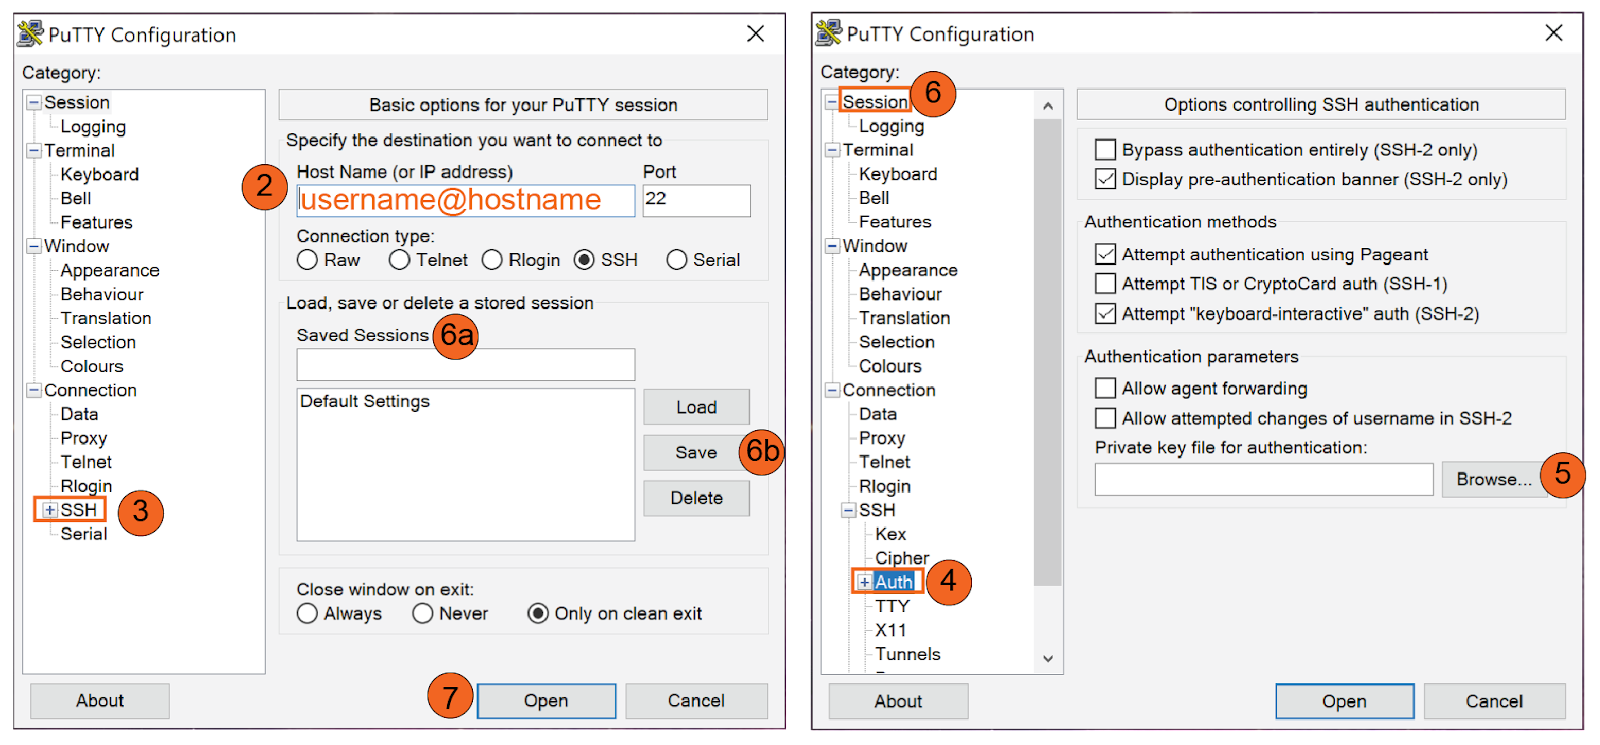
- Open the PuTTY program. If necessary, you can download PuTTY from the website here PuTTY download page.
- Type the address of your assigned login node as the hostname (see "Determine which login node to use" above).
- In the left hand menu, click the "+" next to "SSH" to expand the menu.;
- Click "Auth" in the "SSH" menu.
- Click "Browse" and specify the private key file you saved in step 5 above.
- Return to "Session".
- Name your session
- Save session for future use
- Click "Open" to launch shell. Provide your ssh-key passphrase (created at Step 4 in PuTTYgen) when prompted to do so.
Running Your First Job
OSG has some great video tutorials on how to run jobs and use HTCondor posted on YouTube:
Nearly all of the time, when you want to run an HTCondor job, you first write an HTCondor submit file for it. In this section, you will run a ‘hostname’ command.
Here is a straightforward submit file for the hostname command:
executable = /bin/hostname
output = hostname.out
error = hostname.err
log = hostname.log
request_cpus = 1
request_memory = 1GB
request_disk = 1MB
queue
Write those lines of text in a file named hostname.sub.
Note
There is nothing magic about the name of an HTCondor submit file. It can be any filename you want. It's a good practice to always include the .sub extension, but it is not required. Ultimately, a submit file is a text file.
The lines of the submit file have the following meanings:
| executable | The name of the program to run (relative to the directory from which you submit). |
| output | The filename where HTCondor will write the standard output from your job. |
| error | The filename where HTCondor will write the standard error from your job. This particular job is not likely to have any, but it is best to include this line for every job. |
| log | The filename where HTCondor will write information about your job run. While not required, it is a really good idea to have a log file for every job. |
| request_* | Tells HTCondor how many cpus and how much memory and disk we want, which is not much, because the 'hostname' executable is very small. |
| queue | Tells HTCondor to run your job with the settings above. |
Note
We are not using the arguments or transfer_input_files lines that were mentioned during lecture because the hostname program is all that needs to be transferred from the submit server, and we want to run it without any additional options.
Double-check your submit file, so that it matches the text above. Then, tell HTCondor to run your job:
username@learn $ condor_submit hostname.sub
Submitting job(s).
1 job(s) submitted to cluster NNNN.
The actual cluster number will be shown instead of NNNN. If, instead of the text above, there are error messages, read them carefully and then try to correct your submit file or ask for help.
Notice that condor_submit returns back to the shell prompt right away. It does not wait for your job to run. Instead, as soon as it has finished submitting your job into the queue, the submit command finishes.
View Your Job in the Queue
Now, use condor_q and condor_q -nobatch to watch for your job in the queue!
You may not even catch the job in the R running state, because the hostname command runs very quickly. When the job itself is finished, it will 'leave' the queue and no longer be listed in the condor_q output.
After the job finishes, check for the hostname output in hostname.out, which is where job information printed to the terminal screen will be printed for the job.
username@learn $ cat hostname.out
iitce1.iit.edu
The hostname.err file should be empty, unless there were issues running the hostname executable after it was transferred to the slot.


