

Faculty, staff, students, and those not affiliated with the university may use Google Takeout to export their pictures from Google Photos.
Using Takeout does not remove your data from Google; Takeout exports a copy of the data.
Things to Note
- This process will not delete your pictures from Google Photos. You must manually delete your pictures after the export.
- Pictures will lose their metadata (date taken, ISO, geolocation, other camera information). This data will be located in a .json file that shares the name of the picture file. There are third party tools to fix this.
1) Prepare Your Library for Export
Follow these steps if you have shared albums / have had albums shared with you.
If photo albums have been shared with you and you would like to ensure all of those pictures are included in your export, follow these steps:
- Navigate to photos.google.com and sign in with your Illinois Tech credentials.
- In the top-left menu, click on Sharing.

- Click on your first shared album.
- First we’re going to look at photo albums, not direct conversations. If you have shared photos directly with another Google Photos user, those steps will follow below.
- Once you’re looking at the shared photo album, look in the top-right corner.
If another user in the album has added pictures, you will see a cloud icon. Click on this icon to add their shared pictures into your library. Doing so will include these pictures in your export.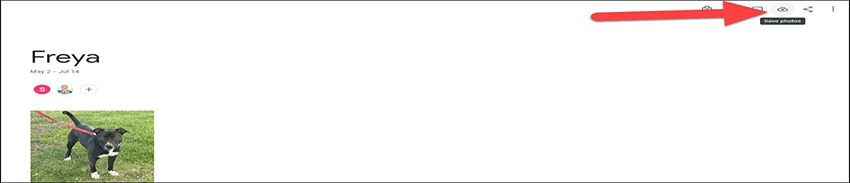
- You will see a “Saved” popup confirmation in the bottom left corner once the photos have been saved to your library. This should only take a couple seconds.
- Repeat this with every shared photo album.
- If you have direct “conversations” appearing in your Sharing screen, click on one of them.
- Under each entry (share picture or group of pictures) there is a Save button.

- Click Save for every photo or photo group that you would like to be included in your export.
- Under each entry (share picture or group of pictures) there is a Save button.
- Once you have “Saved” everything you wish to have in your export, continue down this guide.
These shared photos that you add to your library will not count against your storage quota until the original uploader deletes the photos from their account or stops sharing them with you. This explains why you might not see your storage usage change while following this guide.
2) Exporting Your Photos Using Takeout
If you have albums of pictures, the pictures in the albums may be duplicated in the export. Pay attention to the steps below to avoid duplicating pictures.
- Review the “Optional - Prepare your library for export” section above to ensure you have every photo in your library that you would like to retain.
- Navigate to takeout.google.com and sign in with your Illinois tech credentials.
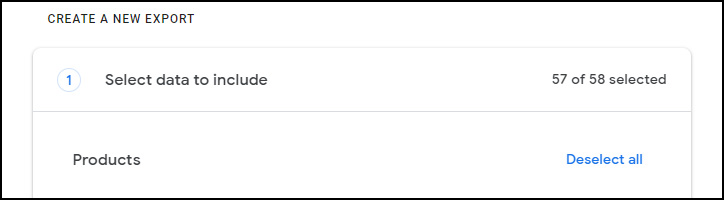
- Click on Deselect all to remove other Google products from your export.
- Scroll down until you find Google Photos and check its box. Then click on All photo albums included.
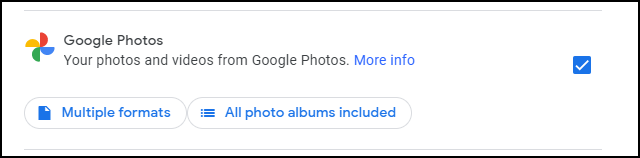
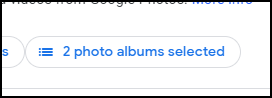
- You will see every photo album listed. You will also see “Photos from [year]” for every year represented by a picture in your library.
- The list items named “Photos from [year]” will contain pictures that are inside of albums. Therefore, if you have both the album checked and the year that the album took place checked, you will have two copies of the contained pictures.
- You may either uncheck the year folder or the album to avoid exporting duplicates.
- ITS recommends that you uncheck the individual albums in favor of the [year] folders to ensure you export pictures that are not within an album.
- You may however leave all boxes checked and deal with the duplicates once you download the export to your computer.
- Once you have selected the appropriate albums, click Ok.
- Scroll down to the bottom and click on Next step.
- Leave “Transfer to:” as “Send download link via email.”
- The “Add to OneDrive” option may sound appealing, but you will need to download the export to your computer to extract it anyway, so ITS recommends skipping using OneDrive as a “middleman” at this step.
- Use the following options:
- Export Once
- .zip as the file type
- You have a choice of file size for the resulting .zip files.
- Choosing a low file size:
- You will end up with more zip files that you need to download and extract.
- If you don’t have a strong internet connection, this option may be safer for you, as each download is smaller.
- If you have a slower computer, it will be easier for you to extract smaller .zip files.
- Choosing a larger file size:
- You will have less .zip files to download and extract, but they will take substantially longer to download. The downloads will be interrupted if you navigate away from the page, or if the page is left in the background for 15 minutes.
- Your computer will take a longer time to extract the data from the .zips and multitasking during this time may be hindered.
- If you have a strong internet connection and a modern computer, a larger file size can be a safe choice. ITS has tested the 50GB choice and confirms it works in this given scenario.
 If a single file is larger than your chosen .zip size, you will receive a download link specific to that single file.
- Choosing a low file size:
- Click Create export. You will receive an email when your export is ready to download.
Working With Your Exported Data
You will find you have a greater number of files than pictures in your library. This is due to Google separating the metadata from your pictures and saving it into a separate file. Picture metadata includes date taken, ISO, geolocation, whether the flash was used, and other camera information.
- You exported data is available to download as a .zip (compressed) file. Follow the link in your email to download your (multiple) export file(s).
- The download of your export may take a long time. Please keep the Google Takeout window open to ensure the downloads complete. If you minimize the window or work in another window, the downloads will fail after 15 minutes due to a need to authenticate.
- Once you have the .zip downloaded, you may open the .zip file to view the contents.
- Your library is now copied onto your computer. Your Google Photos library (the website) is intact and still using cloud storage space.
- Looking at your pictures, you will see each picture file has an accompanying .json file that contains the metadata of that picture.
- The following are not university provided resources, please investigate these options to find what is best for you:
- There is a third-party application (not created by Google or Illinois tech) that rejoins the metadata to the picture files. This app is free for users that want to process up to 100 pictures. Users can submit a one-time payment for full access to the app to process more pictures at once. ITS has tested this application with an export of 38,000 images and the application worked as advertised.
Learn more at: https://metadatafixer.com/ - If you do not want to use an application, it is possible to create a custom script to rejoin the metadata to the respective pictures.
Learn more at: https://github.com/TheLastGimbus/GooglePhotosTakeoutHelper
Deleting Photos From Google After Export
Be sure to return to photos.google.com to delete your photos from the site once you have exported them. They will count against your storage quota until they are deleted.