Can't Join in person for 2023? Enjoy these past activities at home! More at-home activities can be found on the National Engineers Week tab as well.
The Illinois Tollway

Building a Monarch Butterfly Puddling Station
This presentation includes instruction on building a Butterfly Puddling Station for habitat needed to help Monarchs and reinforce the importance of pollinators. An introduction to the term, biomimicry, and new technologies originating from research on Butterfly Characteristics.
Ages: 8-10 (Grades 3-5)
Materials List:
- Glass plate, bird bath or saucer
- Rocks /sticks/ glass pebbles or other butterfly perch
- Wet sand, gravel, or dirt
- Moisture source (water or to be left outside for filling with rainwater)
Learn More about Illinois Tollway Sustainability
Chicago ACS - American Chemical Society
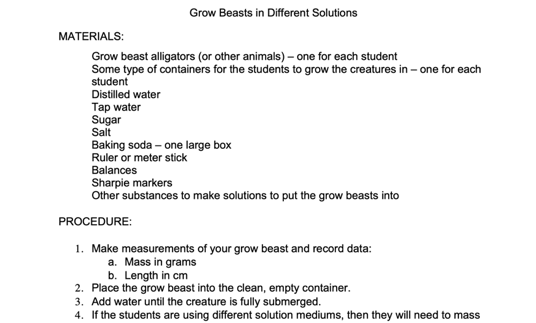
Grow Creatures
Try this experiment and watch as these tiny creatures grow 5 to 10 times their original size… maybe more… once you drop them in water. These growing wonders are made out of a special superabsorbent polymer that soaks up water. The polymer, or hydrogel, is similar to the non-toxic chemical used in baby diapers. So, don’t overlook the educational value of these popular toys.
When studying chemicals one of the main characteristics that chemists look at is pH level. This determines whether a substance is an acid, base or neutral. Using this knowledge, chemists can predict how a substance with react with other substances,
No longer must you search for specialty litmus paper, create your own acid and base detecting litmus paper using little more than a bit of fruit.
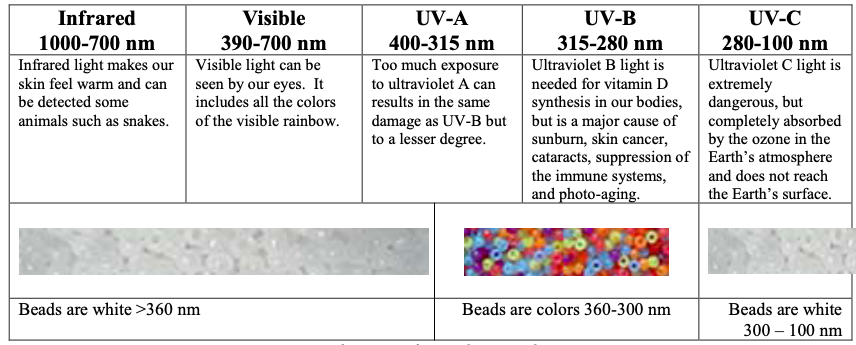
Every wonder how much UV light is coming from the sun or whether or not your sunglasses are blocking out UV light. What about how good your sunscreen is? Learn about electromagnetic radiation with UV beads.
SCARCE - School & Community Assistance for Recycling and Composting Education
Did you know you live on a watershed? We all do! This video uses a watershed model to teach about water pollution and water quality issues in a fun way.
The energy bike is a hands-on and feet-on tool used to teach about the importance of energy conservation and efficiency. Using efficient lighting can help conserve a lot of energy! See the differences in the Pedal Power it takes to run an Incandescent, CFL, and LED light bulbs.
Society of Women Engineers Chicago Regional Section - SWE-CRS
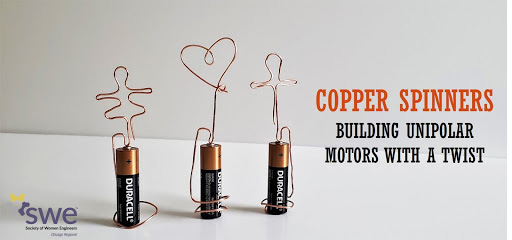
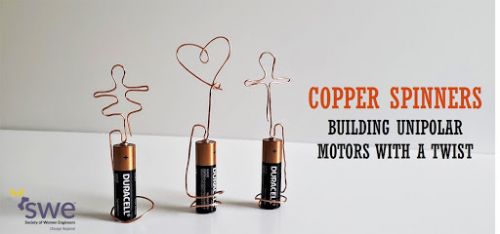
COPPER SPINNERS: Build a Unipolar Motor with a Twist
Calling all future mechanical engineers--this activity is for you! Build your very own unipolar motor, a direct current motor that produces constant circular motion with magnetism. The only materials needed are copper wires, magnets, a battery, and imagination. See how to make your copper wires spin!
Ages: 11-18 (Grades 6-12)
Materials list:
- 1ft long copper wire (18-gauge)
- Neodymium magnets (2-6)
- AA battery
- Pliers
- Wire cutter
American Society of Mechanical Engineers - ASME Fox Valley Section
How exactly do levers and other simple machines make our lives easier? Watch and find out how. (Videos are for demonstration only. Any attempt to duplicate at home MUST have your parents permission and supervision before trying anything seen in these videos.)
Can you Bend a Nail without any help?
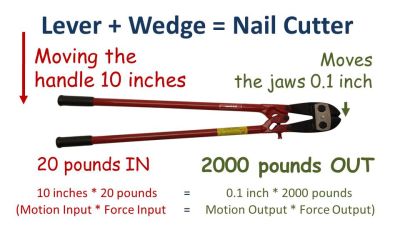
Can you Cut a Nail without any help?
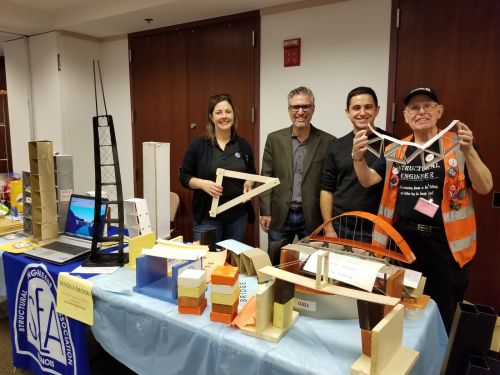
The Structural Engineers Association of Illinois - SEAOI
Explore how Structural engineers make everyday things work and keep you safe!
Watch Bob Johnson (@EngineerGuySE) use a simple piece of paper to demonstrate how floor and bridge structures can be modified into different shapes to increase their strength and ability to hold more weight. Explore more of Bob Johnson’s Structural Engineering demonstrations on his channel EngineerGuySE.
American Society of Non-destructive Testing - ASNT
This video provides insight into the industry that ASNT represents, the world of Non-destructive testing (NDT). It shows how it’s a viable and rewarding career for STEM oriented students of all kinds.
This video provides background into the ASNT organization. It goes into the story of how and why it was formed; along with showing how it grew to be the global organization, thus cementing itself as standard for the industry’s best practices.
American Society for Quality, Fox Valley Section - ASQ
The Real Word of Engineering - Cooler Than You know
Ages: 12-17
This video presentation explores the varied and interesting Engineering Careers students may pursue. Do not think that Engineering is boring or just for boys! Many types of engineers become involved in performing quality tasks and activities, and perform Quality Engineering types of work during their engineering careers. Explore 14 types of engineering careers.
Civil Air Patrol - CAP IL Wing
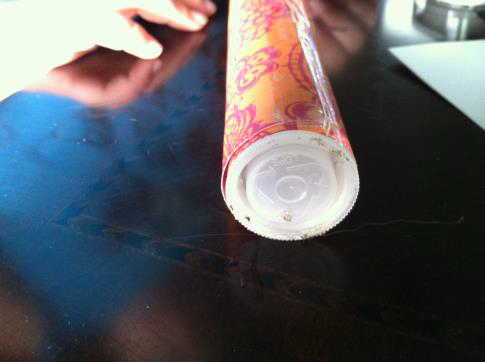
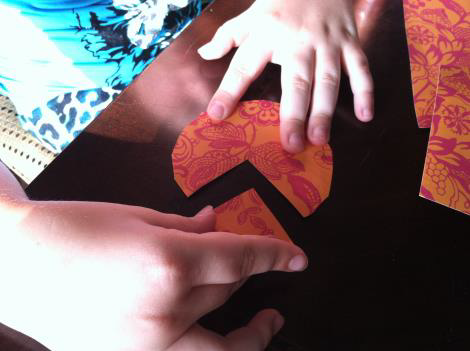
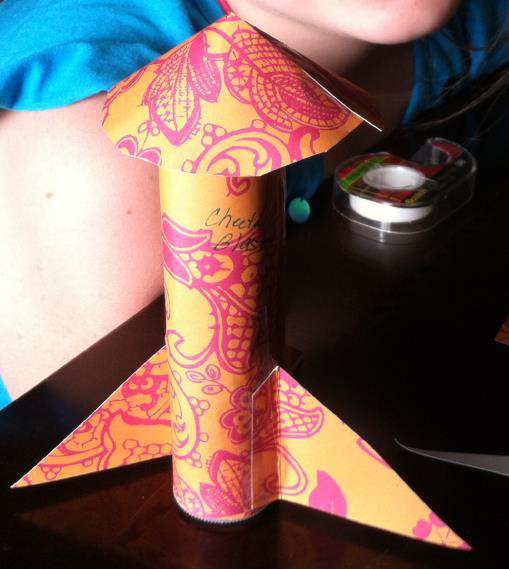
Learn how to build and launch simple rockets with things you have around the house.
Click the drop-down menu for the 2021 Presentations and explore 9 more aviation videos! Ranging from model rocketry, drones, ballooning, and even into outer space with astronomy and the search for Skylab!
If you’re ages 12-18 learn how you can become a cadet. If you’re dreaming about a career in aviation, space, or the military, CAP’s Cadet Program is for you.
STEM Expo video presentations can be found in one spot on our YouTube Playlist
Past Live Events
From a Hobby to a Career - Can a Ham be Cured?
February 26, 2022 2:30 p.m.– 3:15 p.m.
Do you enjoy Ham Radio or are interested in learning more? Explore this hobby and learn how it can go from Hobby to a Career!
What Can you do with an Engineering degree?
February 26, 2022 1:30 p.m. -2:30 p.m.
Are you interested in an Engineering degree , or already an engineer thinking about a job change?
Presented by IEEE
Take Home STEM Kits
Not able to get a Take-Home STEM activity kit? Don't worry, we have the activity information here for you to do at home! Bonus activities listed on some instruction sheets. Please note, not all activities are included here, as portions came from outside organizations. Activities can be completed without the Take Home STEM Kit. *Minimum age 6-8 years, varies based on activity. Adult supervision required. Basic Safety precautions must be followed.Magnetic Slime
Please read through instructions prior to beginning this Science activity.
Slime is made magnetic by adding iron to it and is attracted to a strong magnet. You can get the slime to move without touching it! Watch it wiggle its way towards the magnet or place the magnet on top and watch the slime “swallow” it up!
Safety Notes: This science activity is only for children old enough to understand and follow basic science experiment safety precautions. Adult supervision and participation is required. The magnet must be kept away from the mouths of children, adults, and pets! Take precaution not to breathe in the Iron Oxide powder. It is categorized as non-toxic, and labeled only as a ‘nuisance dust’, which means no mandatory PPE required but masks, gloves, and safety glasses can be used for added safety. Avoid contact with skin, eyes, and mouth. You can pour from the container into the glue to avoid direct contact with the Iron Oxide powder. Borax is commonly used in laundry detergent, but basic safety precautions should be taken to avoid contact with eyes, skin and mouth. See MSDS for each product for detailed safety precautions. These safety notes are listed as an abundance of caution. Materials are not for consumption. Illinois Institute of Technology is not responsible for misuse or mishandling of materials.
Prep Time! Here’s what to gather before you get started.
Materials needed:
- A disposable tablecloth or something you don’t mind potentially getting stained for under your work area. Play clothes might be a good idea too! Iron Oxide powder can stain.
- White PVA Glue (common names include Elmer’s or School glue)
- Warm Water
- Mixing bowls (or disposable cups), Plastic spoons or craft sticks for mixing
- Measuring cups (½ cup, ¼ cup)
- ½ tsp of Borax (can substitute most laundry detergent, unscented and undyed is best)
- 1 Neodymium Bar Magnet (Strong magnet! Responsible adult supervision required. Dangerous if swallowed)
- 2 Tablespoons Iron Oxide Powder (use precaution not to breathe in when in powder form. Recommend adult pour this into the glue and start the mixing process)
How to make your magnetic slime!
Gather all needed materials.
Prepare Borax solution - Mix ½ cup warm water with the Borax and set aside.
Pour ¼ cup White PVA Glue into mixing bowl or cup (scrape all the glue out of the measuring cup with your spoon as needed)
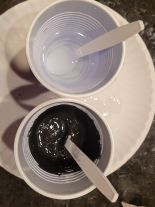
Adult add-in the Iron Oxide powder into the glue. Gently mix until wet, then you can hand off the bowl or cup to the child to finish mixing. Note - at first this may look like an Oreo that has crumbled in milk.
Mix well (it should turn completely black)
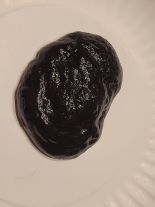
Top: Borax solution. Bottom: Mixed glue and Iron Oxide powder
READ through 1st -> Pour in prepared Borax solution a small portion at a time as you likely won’t need all of it. This will leave some reserved in case you need to ‘fix’ your slime later. After beginning to add your Borax solution you’ll start to feel a difference as you stir, the borax and glue will ‘set-up’. Their polymers are cross-linking and you will notice they are pulling together.
Stir well.
There may be some leftover liquid in the bowl, that’s ok.
You can now remove your slime from the bowl or cup and knead with your hands until you have a ball of slime. Optional: Wear gloves or put the slime into a ziploc bag for kneading. The black should no longer be coming off much, so less of a mess concern.
Option to pat the ball of slime dry so it’s less sticky or rinse it off.
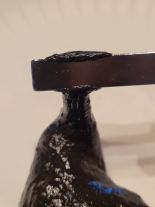
Your slime is ready! But 1st we recommend washing your hands between kneading and playing so that the slime isn’t sticking to your hands. Please note, don’t expect big movements between the slime and magnet. For better movement, pull out smaller sections of the slime. Your child should be able to feel the pull of the magnet when holding it close. Stretch it out, hold it up and let it hang, explore how the slime moves and how it can interact with the magnet.

Clean up with warm, soapy water (vinegar may help as well if it gets somewhere it shouldn’t). After you're done playing, you can store the magnetic slime in the container the iron oxide powder came in, but don’t expect it to last a long time. Iron Oxide is what makes up rust and your magnetic slime will ‘rust’ after several days. It’ll last longer if kept in an airtight container!
Slime fixes: Did your slime not turn out quite right? If it’s stringy and too sticky, add more borax solution. If it’s clumpy and slides right off your spoon or fingers, add more glue. Did you run out of borax? Don’t worry, it’s the active ingredient in most laundry detergents. You can add a little laundry detergent to your mix (unscented, color free is best - Tide he free & clear is ideal, but most work with an exception for 7th generation). You can make slime anytime simply by adding glue and laundry detergent (that has the active Borax ingredient). Adding food coloring, glitter, etc. to make it your own.
Science behind the fun! (and a Bonus Science experiment!)
Slime is not a liquid or solid, it’s something between called a non-Newtonian fluid. A non-Newtonian fluid is a fluid that does not follow Newton’s law of Viscosity (Viscosity is a measure of a fluid’s resistance to flow). For example, water flows fast as it has low viscosity (low = not resistant to flow). Honey flows slowly, so it has high viscosity (high viscosity = resistant to flow). So back to our slime being a non-Newtonian fluid. This type of fluid is one that changes viscosity through stress! Think about how the slime changed when you stirred, kneaded, and stretched it! Its viscosity changed and can continue to change because it is a non-Newtonian fluid. There is likely a non-Newtonian fluid in your fridge right now! Can you guess what it is? Think of something between a liquid and solid that changes how it flows by squeezing or agitating it. Still stuck? Think of something that is sometimes hard to get out of a bottle.
(Answer = ketchup! Ketchup can be hard to get to move out of a bottle, but as soon as we squeeze or hit the bottom of the bottle it starts flowing! We are changing it’s viscosity!)
Non-Newtonian fluids have 2 basic behaviors called Shear-thinning and Shear-thickening. Quicksand is a shear-thickening non-newtonian fluid! You can make homemade quicksand by adding water to cornstarch until no dry powder remains. It’ll look like a liquid until you squeeze or poke it!
Slime is a Polymer! Polymers are large molecules made up of long chains or networks of smaller molecules called monomers. Slimes polymer property is what allows it to bend and stretch. Explore polymers more online.
Iron Oxide Powder contains iron filings, which are the magnetic material. Iron is one of 3 elements that are magnetic at room temperature (Iron, Cobalt, and Nickel - which are grouped together on the periodic table).
The Iron filings can’t be separated out after they are mixed in due to adhesion, which is a force that binds molecules together. The slime itself is bonded together by cohesion, which is the force that holds molecules of the same substance together. Magnetism, and Adhesion, and Cohesion, oh my!
Other slime science concepts you can explore more of online: States of matter, elasticity, and cross-linking!
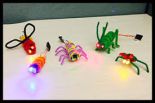
Circuit Bugs
Please read through instructions prior to beginning this Technology activity.
Your bug lights up because you create an electrical circuit. A circuit is creating a path that allows electricity to flow. A circuit must include a source of electricity (in this project it’s the battery). Next you have to have a conductor. A conductor is a material that allows electric current to pass through it easily (in this project it’s the copper tape). Finally, to make the circuit you’ve created useful, you have to give it something that can use the electricity (in this project it’s the LED bulbs).
Safety Notes: This Technology activity is only for children old enough to understand and follow basic safety precautions. Adult supervision and participation is required. Basic battery and electrical safety and precaution should be taken. Batteries must be kept away from the mouths of children, adults, and pets! The conductive copper tape may have sharp edges. Avoid contact with eyes. These safety notes are listed as an abundance of caution. Materials are not for consumption. Illinois Institute of Technology is not responsible for misuse or mishandling of materials.
Prep Time! Here’s what to gather before you get started.
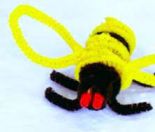
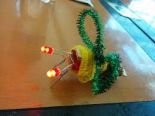
You and your child will probably want to discuss what to make prior to getting started. For example, you’d need yellow and black pipe cleaners to make a bee. If you want to make an alien bug with lots of eyes you’ll need googly eyes. For a spider you’ll need several pipe cleaners to have enough to wrap the clothespin and have 8 legs. Also, the instructions show how to make the circuit bug using the LED lights as eyes, but your child may want to use them as a light up tail instead. Not so creative? Type ‘circuit bug’ into any internet browser and you’ll see lots of options to replicate and make your own.
Materials needed:
- Craft supplies based on what you want your bug (or alien, or spider to look like!)
- Pipe cleaners (colors and quantity will vary based on what you want your bug, alien or spider to look like) Optional: Other craft supplies such as pom poms, feathers, google eyes, coffee filters, small beads or stickers, etc.
- Tape (regular, mounting, etc), or glue dots
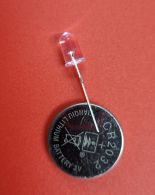
- 1 Battery - CR2032 3V
- 1 Clothespin
- 1-2 LED Lights
- 2 Strips of Copper Tape (approximately 5” each)
How to make your Circuit Bug!
Gather all needed materials.
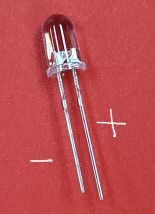
Test to ensure your battery and LED lights are working by placing the battery between the LED light prongs (see images). Notice the LED light has 1 prong longer than the other, that is the + side. Make sure the longer prong is on the + side of the battery to get it to light up. You just made a basic circuit!
Why won’t it light up if the positive side isn’t on the positive side? Because electrical energy can only flow in one direction. This results in the circuit being incomplete, open, or ‘broken’ because the electrical
energy can not flow. Electric current needs a closed or complete circuit to flow. If you want to explore more, continue learning online about positive and negative electrons and how they flow from negative to positive in a battery.
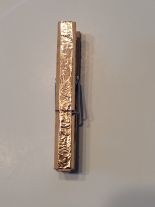
Adhere the copper tape along both sides of the clothespin, ensuring to wrap over both ends as shown in the images below. Note: your copper tape may be a bit longer than needed, you may cut off any excess.
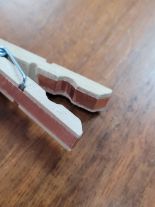
Place the battery into the closed end of the clothespin (see image).
Spread open the prongs on the LED’s and place them over the open end of the clothespin as shown below, ensuring the prongs are touching the copper tape. Remember your circuit has to be complete to work! The long prong must be on the positive side of the battery, and negative on the negative side. You’ll know it’s correct if they light up! If they don’t, here’s what to check: Are the prongs on the correct side? Are the prongs touching the copper tape? Did the copper tape get damaged? (this can result in it not being conductive) If all else fails, you can simply keep the LED’s on the battery as shown in Step 2 and continue making your bug.
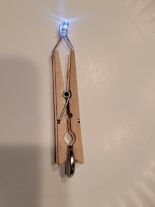
If the lights are working properly, you have a complete circuit, and you can now secure them down. Use tape or glue dots to hold them in place. This isn’t required, but they can easily wiggle loose if they are not secured.
Get creative! Now you can use your craft supplies to create your bug. Wrap pipe cleaners around your clothespin to create your bug's body. Bend or cut the pipe cleaners to make legs, or eyestalks, or loop them to make wings! Examples below borrowed from online images (or search circuit bugs online for more ideas)
More Technology fun!
Let’s talk about the “T” in STEM for a moment. Technology is all around us and a large part of our daily lives. Technology includes electricity, photography, computers, and coding. The Circuit bugs you created allowed kids to explore and learn about electricity (and the circuits needed to make electricity useful), but we don’t want to forget the other areas of technology.
Photography offers a variety of ways to explore, but one that lends well to even young students, and can be done almost entirely on their own, is Stop Motion Animation. Stop Motion Animation allows for autonomy and creativity in the filmmaking process, encourages problem solving and project planning, fosters experimentation through trial-and-error learning, and supports storytelling. It’s simple hands-on technology that even young kids can achieve. Here’s a reference to get you started: https://tinkerlab.com/easy-stop-motion-animation-kids/ or do an internet search for “Stop Motion Animation for kids” and you’ll find numerous videos and articles.
Computers our kids probably know how to use better than many adults, as they have grown up interacting with them daily for games, socializing, and school work. If your child wants to learn what is needed for a computer to function there are a variety of build your own computer kits online (ages 6+ to really advanced).
Coding gets computers to do or behave in a certain way by providing a list of step-by-step instructions. Coders, or programmers, are people who write the code using a programming language. We see the end result of coding in games, apps, websites, and computer software. Want to try to code yourself? There are several free websites for kids to explore how to code. https://code.org has free projects for children as young as 4 years old. Just click ‘create’ on the upper right hand corner to get started.
Simple Catapult
Please read through instructions prior to beginning this Engineering activity.
Building a simple catapult allows for exploration into basic mechanical engineering. You’re creating a simple machine that works like a lever. When you push down on one end and let it go it changes the direction of the force and pushes the object in the opposite direction. To work a catapult uses stored energy (tension, torsion, and gravity) to launch your object(s). Once you launch, the object will have kinetic and potential energy (kinetic as it rises, potential as it falls).
Engineering is so cool!
Engineers design and build much of the world around us! Engineering is needed for fun things, such as roller coasters, but it’s also essential in bridges and tunnels. Engineers make things safer, such as helmets and playground equipment. Engineering goes into really cool things too, such as toys, space vehicles, and artificial limbs!
Safety Notes: This engineering activity is only for children old enough to understand and follow basic safety precautions. Adult supervision and participation is required. Basic rubber band and catapult safety should be followed. Use of soft objects in the catapult is recommended and both the rubber band and catapult should not be aimed at other people or pets. These safety notes are listed as an abundance of caution. Materials are not for consumption. Illinois Institute of Technology is not responsible for misuse or mishandling of materials.
Prep Time! Here’s what to gather before you get started.
Materials needed:
- Optional: soft materials to launch with your catapult. Other materials to make additional alternate catapults as desired.
- 6 Craft Sticks
- 3 Rubber bands
- 1 Plastic spoon
- 1 pom
How to make your simple catapult!
Gather all needed materials.
Take 5 sticks and stack them, securing one end with a rubber band. Wrap the rubber band around several times to ensure the sticks are secure.
Slide the 1 remaining stick between the bottom stick and the rest of the stack (see image).
Secure the other end with a rubber band.
Place the spoon as shown (see image), and attach the end of the spoon to the end of the single stick with the last rubber band.
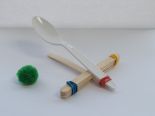
You’re ready to launch! A pom is included to hurl through the air, but other soft objects can be used. Why do some fly better than others? If you move the spoon end farther away from the stack does the catapult work better or worse? Why?
Want to challenge yourself?! Can you make a better catapult? You can engineer a new design using the same materials, or change or add to them with objects from home? Adult permission required to use household materials.
Perimeter Magic Triangle
Please read through instructions prior to beginning this Math activity.
Math can sometimes seem hard or boring to kids, this puzzle makes math tangible. It helps young minds see math in a whole new way and allows for small adjustments to work towards a correct answer. They will be able to see the difference in stack heights and then by adding the numbers next to each pile they’ll associate the numbers to what they are seeing.
Prep Time! Here’s what to gather before you get started.
Materials needed:
- 21 Pennies or other same size stackable objects
- Ex. small blocks, or wrapped candy
- Scissors
- Perimeter magic triangle of order 3
How to use your Perimeter Magic Triangle!
Gather all needed materials.
Cut along all the dashed lines below the triangle. Set aside the numbers for now.
Try and solve the puzzle of the perimeter magic triangle!
Here’s How to Play:
In each circle on the triangle create a stack with your pennies, but no stack can be the same height as another!
The total number of pennies on each side has to equal the total of the other 2 sides.
Every circle has to have at least 1 penny.
Think you’ve solved it? Check by adding your number circles next to each stack and add the numbers to get a sum total for each side. Did you use each number once and each side equals the other 2 sides? Yes? Then you’re right! But, there’s more than 1 answer! Can you come up with 2, 3, or 4 different solutions?
(Hint: the 4 different solutions will have sides totaling 9, 10, 11 and 12)
Want to increase the challenge? Draw out a new triangle and add 1 more circle per side (pictured below for reference) for a Perimeter magic triangle of order 4. You’ll need to increase your circled numbers to 9 and your small stackable objects to 45. There’s 18 different solutions!
Perimeter magic triangle of order 4 (templates courtesy of ScienceBuddies.org)
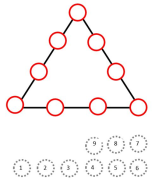
Want to make it even harder?? Adding 3 circles on each side increases the challenge even more with a Perimeter magic triangle of order 5! You’ll need 12 circled numbers and 78 small stackable objects.
Note: The stackable objects aren’t required as you can use the circled numbers and simply place them on the triangle to find your solutions. Additionally, some kids may prefer to use the numbers instead of stacking objects. The stackable objects allow the student to visualize their solutions, make small adjustments, and makes math tangible.
Want more Math fun!
Another at-home Math STEM activity is as easy as getting out play-doh (or similar item). By simply changing the shape of play-doh your child can learn about volume. Even little ones can engage in this Geometry activity! All you need is to discuss how the volume (the amount of space) of your play-doh doesn’t change when we make new shapes. Start with a cube shape and stretch to make it longer. It’s height will decrease, but it will always have the same volume!
Have older students? Start with a cube shape and change the play-doh into rectangles of various sizes. Have them measure the height, length, and width of the play-doh with a ruler and check the volume (length x width x height = cube volume). Try to get the play-doh as close to square or rectangular as possible for easier measuring and increased accuracy in calculations.