

- Go to your Course Site in Blackboard.
- From the left menu click Assignments (or another Content area).
- Open Assessments and select Assignment.
- Type a name and instructions for your assignment.
- Click Browse Local Files to upload any associated assignment file from your computer (if needed).
- Find and select the file and click Upload.
- Select a due date and time for your assignment.
- Set points possible for the assignment in Grading section.
- From Availability choose when you want the assignment to be displayed to students.
- Click Submit.
If you would like to create an assignment where the student submits a video, set up a Panopto Video Assignment following the steps below.
Students can either create their video submission using the Panopto tool, or they can upload a video to their personal Panopto folder. Please share these instructions with your students on how to submit their video assignment: How to Submit a video Assignment In Blackboard https://youtu.be/YmFXV-8tph0
Create the assignment
- Navigate to the course in which you wish to create the assignment and select the desired content area where the assignment will be located
- Click on Assessments and then select Assignment from the drop-down menu
- Give your assignment a name. Then, in the text editor toolbar, select the icon that looks like a circle with a plus sign in it to open the Add Content menu (if you don't see the full editor, click on the three dots icon to expand the tool bar options).

- In the Add Content menu, scroll to the Additional Tools section and select Panopto Student Video Submission
- This will automatically add the instructions for students to submit a Panopto video assignment to the assignment itself. You may add additional instructions to the assignment. Proceed as you would with creating the assignment in Blackboard, such as a due date and points possible
- Press Submit
Grade the assignment as you normally would, through the Grade Center.
- Go to the course.
- From the left menu, click Assignments (or another Content area).
- From Assessments, select Assignment.
- Type a name and description for your assignment.
- Click Browse Local Files if you want to upload an associated file from your computer.
- Select the file from your computer and click Upload.
- Select a due date and time for your assignment in Due Dates.
- Fill in points possible for your assignment in Grading.
- Open Submission Details drop-down menu.
- From Plagiarism check “Check submissions for plagiarism using SafeAssign”.
- Select an availability date and time for the assignment.
- Click Submit.
- Log into Blackboard as an instructor
- Go to the course
- Click on Assignments
- Click on the Assessments
- Select "Test" from the drop-down menu
- Click "Create"
- Enter a name for the test
- Enter a description and instructions for the test if necessary
- Press Submit
- Click "Question Settings" in the upper-right corner. Review the settings, particularly the Default Point Value for each question.
- Add the questions one-by-one by clicking "Create Question" and selecting the question type from the drop-down menu. There are many types of question types, such as essay, multiple choice, true or false, and short-answer. When possible, enter the correct answer, and even provide correct and incorrect feedback that can be provided to the student after the test is completed.
- When finished adding questions, press "OK" at the bottom of the page.
- Select the test to review the test options - review the availability, multiple choice options, forced completion, timer (Recommendation: do NOT set a timer longer than 1 hr).
- If any student is entitled to extra time, that can be set up in "Test Availability Exceptions".
- Select when to display feedback. Recommendation: after all attempts are graded.
- Recommendation for Test Presentation: One at a time and Randomize Questions.
- Press Submit
- Review the test on the Assignments page. Recommendation: Enter "Student Preview" and take the test yourself to make sure everything is working as expected.
The Blackboard website offers additional resources for instructors who want to use its tests and surveys features.
Blackboard Annotate allows instructors the opportunity to grade and respond to submissions online easily and quickly, eliminating the need to use hard copies in the evaluation process.
Blackboard Annotate is highly customizable and flexible, allowing you to move, edit, and change the text and to select the font, size, alignment, and color of the text. Blackboard Annotate supports many document formats, such as Word, PowerPoint, Excel, and PDF.
Blackboard Annotate allows you to:
- Write comments
- Insert text boxes
- Highlight parts of submissions
- Free draw on submissions
- Add stamps and pictures
- Add shapes and control their color, width, opacity, and more
- Search the submission for specific text
- Create a bank of reusable comments; you can add, edit, delete, and search comments in the library
- Print or download the submission with the annotations
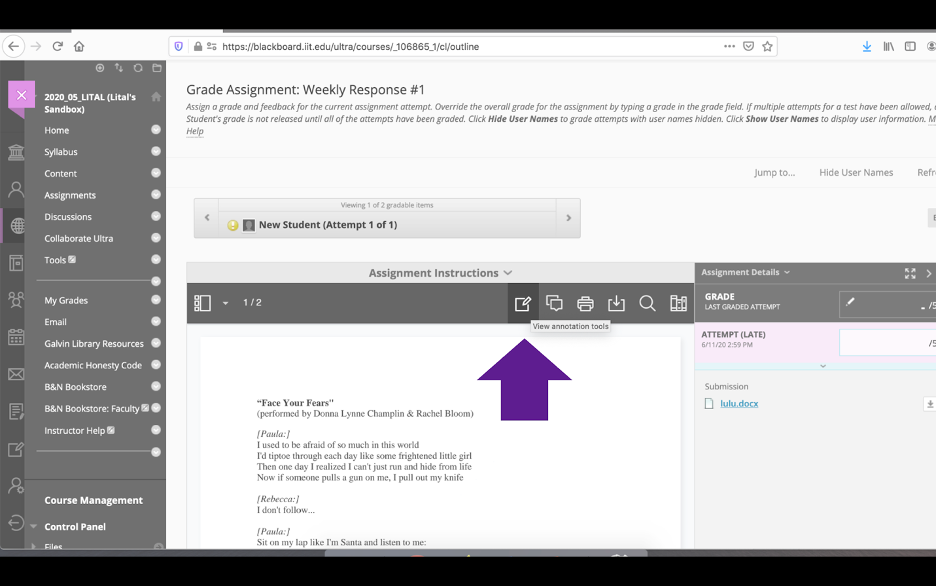
To Access Blackboard Annotate
- Open a student's submission for grading
- Click on the icon for the annotation tools
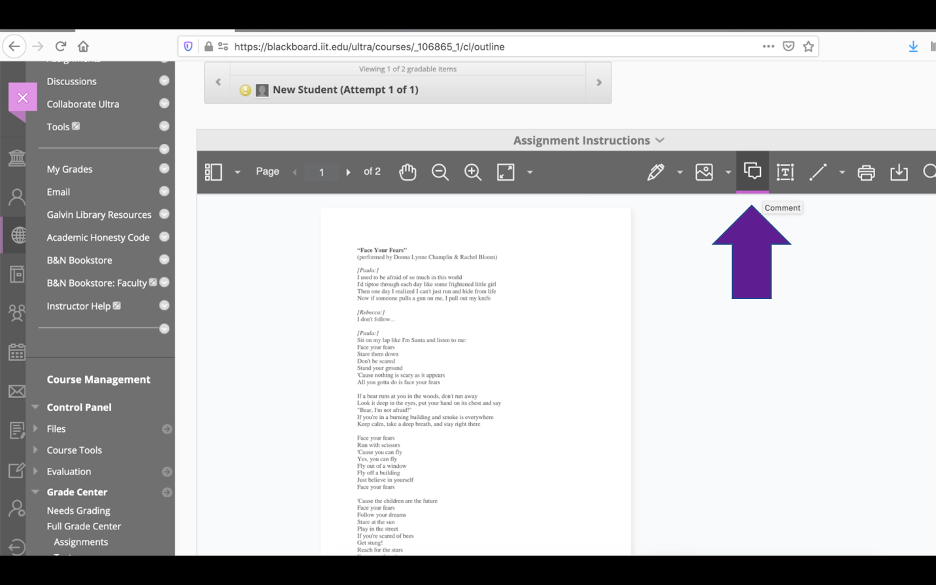
Add Comments on Submissions
The comment tool allows you to provide feedback in comments to any supported file format. Your comments appear in a panel next to the submission.
- Press on the comment icon
- Click where you would like to place the comment
- Type your comment in the box
- Once you are done writing your comment, make sure to click the “Reply” button, otherwise your comments will not be saved once you log out—even if you save your draft or submit it
Insert a Text Box
The option allows you to add text directly on the submission. It also allows you to move, edit, and change the text and select its font, size, alignment, and color.
- Click on the text box icon
- In the sub-menu that will open, you can change the box and font's properties
- Click where you would like to place a text box
- Type in your comment
Highlight Submission Segments
The comment tool allows you to select specific portions of the submission to highlight.
- Click on the pen icon
- In the sub-menu that opens, choose brush
- As you highlight text on the submission, an additional menu opens; through it, you can control your brush's opacity, thickness, and color
- Once you are done, click to select a passage of text you would like to highlight and drag the pointer
- If you would like to delete your highlighting, press the trash icon on the bar's left side and mark OK in the pop-up screen
Freehand “Draw” on Submissions
This tool allows you to draw freehand on the submission with various colors, thickness, and opacity options in any supported file format.
- Select the pen icon
- On the sub-menu that opens, choose ”Drawing”
- On the second sub-menu that opens, you can design your line's opacity, thickness, and color
- Once you are done, click anywhere within the file and drag your cruiser to “draw”
- To remove annotations, select the eraser. You can erase parts of a freehand drawing with the eraser or select the delete icon to delete the whole drawing

Insert Images and Stamps
This tool allows you to choose a preloaded stamp or create your own customized stamp or image to add to the submission.
- Select the stamp icon
- On the sub-menu that will open, select “Stamp”
- On the pop-up menu, click on the stamp you are interested in integrating
- Using your mouse, move the stamp to where you would like to locate it; you can also change its size
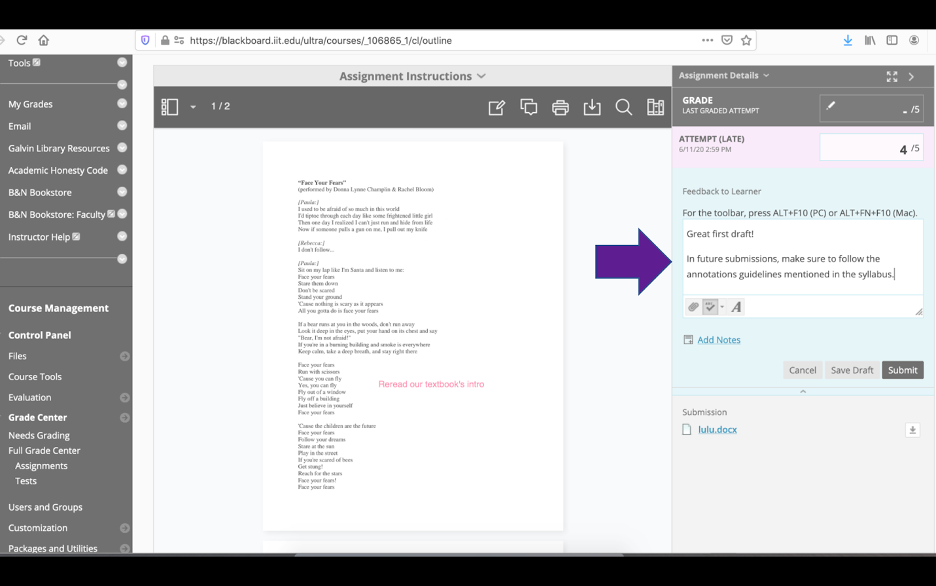
Write Overall Feedback
The right sidebar of the In-line Grading view offers a summary view, providing an overall grade and feedback. It also allows you to view the assignment details, grading rubric, and each attempt.
- To add an overall grade to the assignment, enter the grade in the attempt box; this will be the student’s current grade
- If a rubric was enabled for the assignment, open the rubric to record the student’s achievement on each criteria; Blackboard will calculate an attempt grade based on the rubric
- Provide feedback for students with general comments in the text box in the lower right corner
- After you have finished annotating and grading a submission, click the submit button in the lower right corner
- Students will be able to view their grade, your comments, and your feedback in “My Grades”
Keep in Mind
Annotation sessions expire after one hour. You'll receive a warning message before your session expires. Completed annotations, feedback, and files are saved on the page. When you return, you can resume working.
Assignment submissions created through the editor aren't compatible with in-line grading.
Students can access the annotated files but won't be able to add annotations in their submissions.