

- Log in to Access Illinois Tech (more info)
- Select Blackboard from the list of available apps
- Select “Courses” from the black menu bar located on the left side
- Click on the desired course to enter the course site
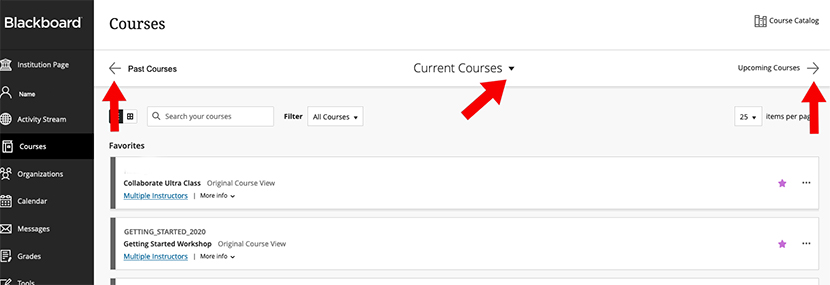
If you are looking for a course from a previous semester
- Press the small arrow located on the right side of the “Current Courses” header
- On the drop-down menu that opens, choose the specific semester in which the course took place
If you are looking for a course in the upcoming semester
- Use the arrows located to the left and right of the “Current Courses” header to choose “Upcoming Courses”
If you are looking for a non-curricular course or workshop
- Use the arrows located to the left and right of the “Current Courses"”header to choose the right category, such as “Training and Professional Development” or “Department and Special Projects”
For all courses
- Once you chose a category, a list of the relevant courses will appear. Within this course list, you can search for a specific course based on course name or Course Reference Number (CRN).
- Download the Okta Verify app from Google Play or App Store.
- Open the app.
- Tap Get Started.
- Tap Next.
- Tap Add Account.
- From Choose Account Type, select Organization.
- Choose Yes, Ready to Scan to scan the QR Code on iit.okta.com login page. Or choose No, Sign in Instead to use your IIT username and password to login.
- Allow Push Notifications by clicking Allow.
- Tap Done.
- Go back to iit.okta.com to log into your Illinois Tech Account.
- Enter your Username and Password.
- Check Remember me.
- Click Sign in.
- Click the drop-down arrow next to SMS icon at the top and choose Okta Verify.
- Check Return Receipt to receive a copy of your email if you wish.
- Check Send push automatically.
- Click Send push.
- Look for a notification from Okta Verify app on your smartphone.
- Tap on the notification and after entering Okta Verify app, tap Yes, it’s me.
- Go to the course.
- Go to Syllabus in the left-side menu.
- From Build Content, select Item.
- Type a name for your syllabus in the box provided.
- Copy and paste your syllabus text in the textbox provided.
- Click Submit.
To create or add content to your course, visit the Blackboard website for in-depth resources to assist with the process.
How to Add Content (Original View)
How to Add Content (Ultra View)
- Go to your Ultra Course
- Click the + in the middle
- Click Create
- Select Document
- To add a text to your document, click Add Content. Type your text and click Save.
- To upload a file from your computer, click Upload from Computer. Select the file and click Upload.
- To upload a file from your cloud service, click Upload from Cloud Storage. Log into your cloud service. Select the file and upload it to your document.
- To change the visibility status of your content, click on the drop-down menu in the upper right corner. Choose the status and close the page.
- To delete or edit your content, click on the three dots icon on the right side of your content in the course content panel.
Add Folder
- Go to your Ultra Course
- Click the + in the middle
- Click Create
- Select Folder
- Type a name for your folder on the top and add descriptions to it in the box provided
- Choose your folder’s visibility status from the drop-down menu and click Save
How to Create a Discussion Board
- Go to your Course Site
- From the left menu, go to Discussions
- Click Create Forum at the top.
- Type a name for your forum
- Add a description in the appropriate box
- Under Forum Availability, choose whether you want your forum to be available right away (Select Yes), or set an appropriate Date and Time for it to become available later
- If you want to grade discussions in your forum, from Grade section, select Grade Discussion Forum and set points possible
- Click Submit
How to Create a Discussion Board, Post as a Student, and Grade a Discussion Board as an Instructor:
In Original View
- Go to the course
- Scroll down to the Control Panel
- Click Users and Groups
- Click Users
- Click Find Users to Enroll
- Enter the user's ID
- Press Submit
- Go back to the Users list and locate the new member
- Use the drop-down arrow next to their username to select Change User's Role in Course
- Select the desired role and press Submit
In Ultra View
- Click "View everyone in your course" under Roster
- Click the + (plus-sign icon) in the upper-right corner
- Select Enroll People
- Enter the name or ID of the user
- Click the + (plus-sign icon) next to their name
- Select the desired role
- Press Save
Instructors who teach multiple sections of the same course may prefer to manage those sections through a single course. To request a combination of two or more courses, fill out the Illinois Tech Course Merge Request Form.
- Your courses will be merged within three business days
- Fill out a new form for each set of combined courses
- Wait until your merged course is created before adding content to the site
It's possible to content some or all materials from one course site to another. Note: To copy a course, you must be listed as an instructor in both courses.
Instructions:
- Log into Blackboard
- Go to the course that you want to copy
- In the Control Panel, click "Packages and Utilities"
- Click "Course Copy"
- Select "Copy Course Materials into an Existing Course"
- In the field for "Destination Course ID", paste the course ID (or browse) for the course you wish to copy the material into
- Select the checkboxes next to all the content you wish to copy
- Do NOT include enrollments in the course copy
- Click SUBMIT
By default, course sites are available the length of the semester. However, instructors can make the available to enrolled students earlier or extend past the end date to provide access to materials. To do so,
- Log into Blackboard
- Go to the course
- In the Control Panel, click "Properties"
- Set Course Availability to "Yes"
- Under Course Duration, enter the desired dates
- Press Submit
Note: This feature is to provide reading/viewing access to materials, not extended time for incomplete assessments. Students must apply for an "incomplete" if necessary.
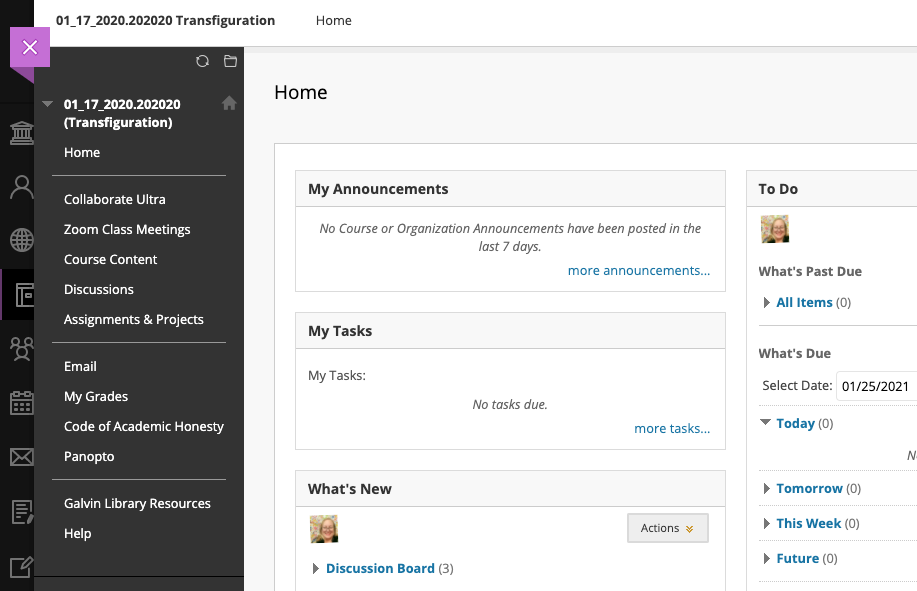
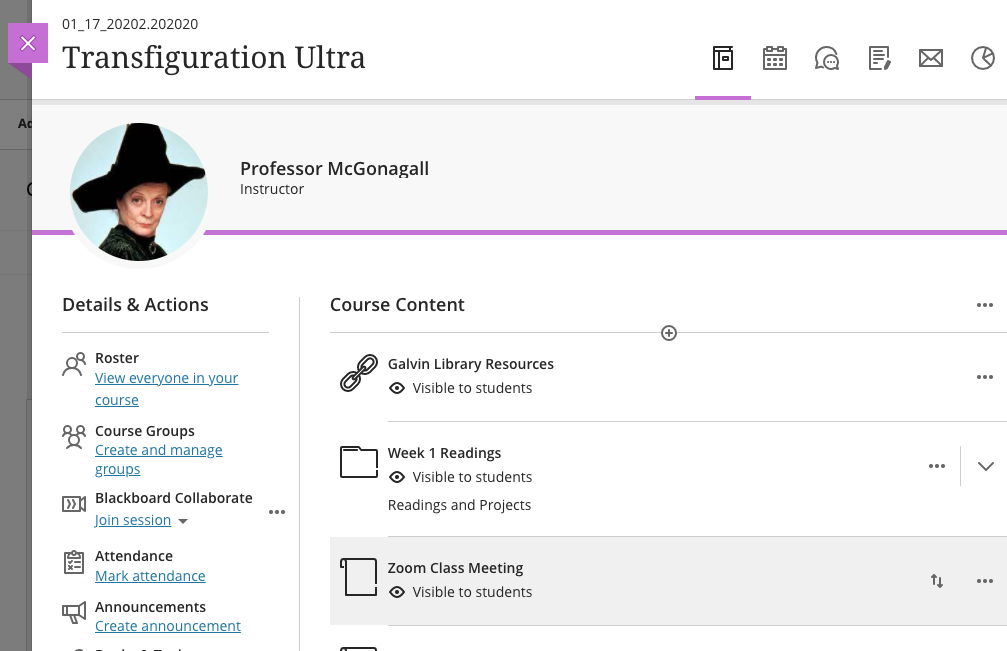
Most Illinois Tech instructors use the “Original View” in Blackboard. This is the classic course site with a dark menu bar on the left side. The “Ultra View” has different arrangement of the elements of your course site. All course content is arranged on the central page, and the left side menu contains instructors tools.
Preview Ultra
To preview the “Ultra View,” log in to Blackboard and go to your course:
- Click on the lock in the upper-right corner to make your course unavailable
- Click on the little pencil that appears next to the lock
- Click “Try the Ultra Course View”
- You'll receive an email when your course has changed—review your course and select either “Use the Ultra View” or “Back to Original Course” to go back to the “Original View.” Proceed carefully: once you select “Ultra View,” you can't go back to the “Original View.”
- Click the lock icon to make your course available to students again
Learn more the differences between Ultra and Original, and learn more about “Ultra View.”
If your course is in Original view, it will have a dark menu bar along the left side, like this:
If your course is in Ultra View, it not have a menu bar, but rather the instructor's name and picture at the top, like this:
- Open the course
- Click Email on the left menu
- Click on Single/Select Users
- Select the desired users from the left box and click > to add them to the recipients list
- Check Return Receipt to receive a copy of your email
- Type the subject and the context of your email in the boxes provided
- To attach a file from your computer click Attach a file and upload the file to your email
- Click Submit